I, once scared to tackle upgrading my printer’s firmware because of concern I may brick it or get worse performance but it turned out to be a non-affair and only took a few minutes.
Why Upgrade?
Many reasons, but the top ones for me are:
- Tram/Bed Level Wizard – I can level using the CRTouch easily right on the device
- Arc Welder Support – Basically gives you better curves
- Thumbnails right on devices
- A faster transfer rate to Octoprint. Double the baud rate
If making this upgrade is a bit scary for you. I wanted to put together a step-by-step guide for upgrading from the Creality stock Marlin firmware to the much better Marlin Professional firmware developed and maintained by Miguel Risco-Castillo whom you can support if so included on Patreon.
Step 1: Which chip does your Ender 3 S1 use?
There are 2 ways to determine this, the easiest (but perhaps out of date if reading this far from the date of writing in 2023) is to look in the on-screen menu under “Advanced” and then “Info” if it is running a version higher than 3.0.0.0 then you will be using the STM32F401 chip and should work against that, if it is lower, in the 1’s then it is using the STM32F103 and you should work against that.
The 2nd way is to turn off the printer, turn it to the side, take the bottom plate off and look at the main chip. Here is a photo of mine
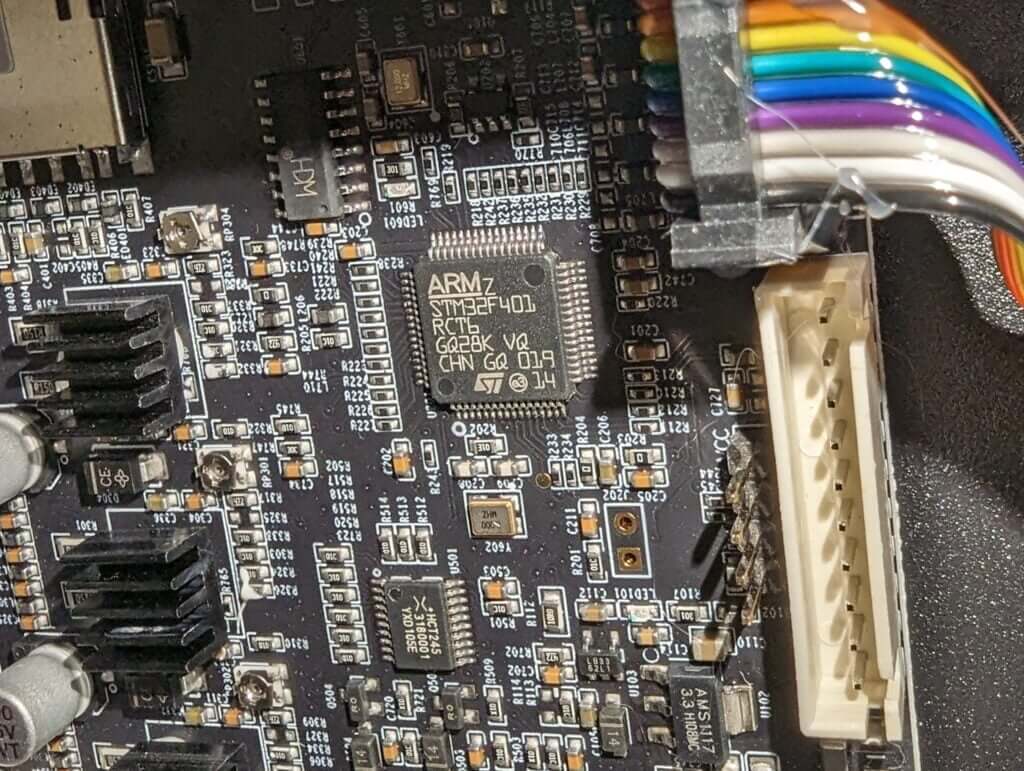
As you can see I have the 32-bit, F401 chipset
Step 2: Download the correct firmware
Go to this page, scroll to the very bottom and looks for the “Assets” section. There you have a few options to download
- F1 – This is if you DO NOT have the F401 chip
- F4 – This is if you DO have the F401 chip
- F4-UBL – This is if you want to install the Universal Bed Leveling version of the firmware. If you are a beginner and reading this tutorial you likely DO NOT want to use this one.
Once downloaded you will have a .bin file on your computer, rename it to the month and year you downloaded it. For example Ender3S1-F4-Jan2023
Step 3: Get the firmware on the printer
This was the scariest step but was also the easiest.
- Turn off your printer, unplug anything plugged into the USB-C Port
- Take out the SD card, put it in your computer
- If you have the F401 chip: Create a new folder on the SD card named STM32F4_UPDATE
- Copy the .bin file to that folder
- Eject and unplug the SD card from your computer
- Put SD card into the printer
- Turn printer on
- Wait 20 seconds
- VOILA!
That should be all there is to it. You now have the latest version of the “Marlin Professional” firmware which should be based on a much more modern version of the main “Marlin” firmware then came with your printer when it was built in the factory.
That said, just like any new printer you will need to set up a few things. This is what I did first.
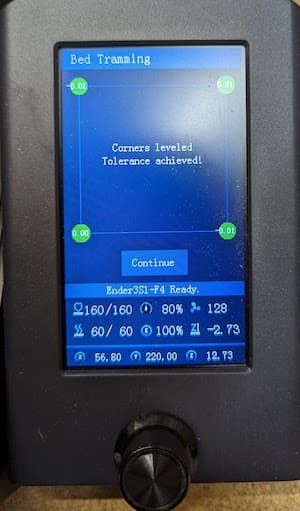
Step 4: Level/Tram the Bed
As you will read on ANY tutorial about any printer issue ever a clean and level bed is the most important thing to getting a good print. Luckily Marlin Professional makes that easier. Just go to Prepare > Bed Tramming > Tramming Wizard and follow the on-screen instructions. It will get you VERY close to level, and from there you can create a mesh (an article for another day) to have the software account for any imperfections on the build plate.
Step 5: Update Slicer
Edit your machine settings here: Preferences > Prints > Machine settings and use the following G-Codes:
Start G-Code
    M201 X500.00 Y500.00 Z100.00 E5000.00 ;Setup machine max acceleration
    M203 X500.00 Y500.00 Z20.00 E50.00 ;Setup machine max feedrate
    M204 P500.00 R1000.00 T500.00 ;Setup Print/Retract/Travel acceleration
    M205 X8.00 Y8.00 Z0.40 E5.00 ;Setup Jerk
    M220 S100 ;Reset Feedrate
    M221 S100 ;Reset Flowrate

    G92 E0 ; Reset Extruder
    G28 ; Home all axes
    M420 S1 Z2; Use Level Mesh up to 2mm;
    G1 Z2.0 F3000 ; Move Z Axis up little to prevent scratching of Heat Bed
    G1 X0.1 Y20 Z0.3 F5000.0 ; Move to start position
    G1 X0.1 Y200.0 Z0.3 F1500.0 E15 ; Draw the first line
    G1 X0.4 Y200.0 Z0.3 F5000.0 ; Move to side a little
    G1 X0.4 Y20 Z0.3 F1500.0 E30 ; Draw the second line
    G92 E0 ; Reset Extruder
    G1 Z2.0 F3000 ; Move Z Axis up little to prevent scratching of Heat Bed
    G1 X5 Y20 Z0.3 F5000.0 ; Move over to prevent blob squish
End G-Code
  G91 ;Relative positioning
    G1 E-2 F2700 ;Retract a bit
    G1 E-2 Z0.2 F2400 ;Retract and raise Z
    G1 X5 Y5 F3000 ;Wipe out
    G1 Z10 ;Raise Z more
    G90 ;Absolute positioning

    G1 X0 Y220 ;Present print
    M106 S0 ;Turn-off fan
    M104 S0 ;Turn-off hotend
    M140 S0 ;Turn-off bed
    M84 ;Disable steppers
Step 6: Test Print via SD Card
Open up one of your previous STLs in Cura, re-slice (with the new G-Code), save to SD and print.
And that’s really it. All in it took me maybe 45 minutes and most of that “active” time was pulling the bottom off the printer to get that photo, something you may not need to do.
As you can see by now in the process the new firmware has quite a bit of advanced functionality, and as you have seen just from the 2 calibration cubes there is some improvement, and I can print at PLA 120 mm/s without an issue. Sometimes going up to 150 mm/s depending on the print. Once I get more experience with it I expect my configurations to improve even futher.
If you are using Octoprint, there is a bit more configuration you CAN do, that said it will just work out of the box, but you can do a bit more to optimize printing. I’ll eventually get a write-up together for it, but for now, I hope this has been helpful for you to get your firmware updated.
Sources
- https://github.com/mriscoc/Ender3V2S1/wiki/Octoprint
- https://github.com/mriscoc/Ender3V2S1/wiki/Slicer-G-code-Scripts