Earlier in the year I switching from being a long time Comcast account holder to CenturyLink. They brought fiber to the home (FTTH) and offered up near-symmetrical gig internet for just $65 month including taxes and fees! Compared to the $100+ I paid Comcast for 50 Mbps it was a no brainer. The experience has been good so far but I have been held back by their included 3000A modem. There was nothing majorly wrong with it it just didn’t have the best range, nor enough ethernet ports for me plus I already had a Nighthawk X8 R8500 sitting unused so I decided to figure how to remove the 3000A. It turned out to be a pain in the ass so I thought I woud share it with you so save you some pain.
Before you read further make sure you are on a CenturyLink fiber plan and your router can set the VLAN. If your router can’t do this then don’t even bother as this guide won’t be for you.
With that out of the way. You may want to take a screenshot or download this page because you will be without internet for a few minutes.
Step 1
Call CenturyLink and get your PPP username and password. You may think its the password on your paperwork you got when you got your internet installed. This is not the case! You need to call to get it. While you are on the line make sure you confirm your VLAN. It likely will be 201, but yours may be different.
Step 2 (this is where you lose internet)
Unplug your CenturyLink provided router and add your new one using the same cable/ports as the old one. Turn off the ONT (where the fiber gets converted to ethernet) wait a minute or so and turn on the ONT and the new router.
Step 3
Setup the router as you would so you can access it. I will use Netgear here as an example
Step 4
Navigate to http://192.168.1.1/start.htm and enter the default user/pass: admin/password. Change it if you would like
Step 5
Navigate to Advanced > Setup > Internet Setup and make sure the following information is present:
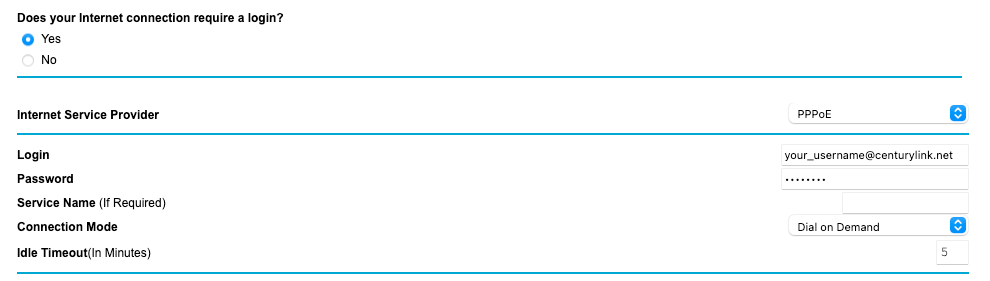
Dial on Demand Idle Timeout: 5This is where I got stuck for a while. I thought “Always On” was what you needed since it was fiber, but I was inncorrect. It HAS TO BE Dial on Demand
Step 6
Navigate to Advanced > Advanced Setup > VLAN/IPTV Setup and duplicate the setup in my screenshot below. If you have Prism TV this will be different.
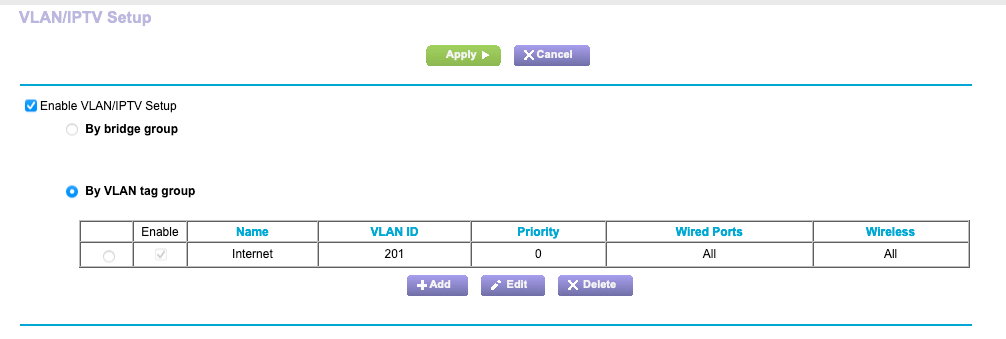
VLAN tag group VLAN ID: Whatever CL gave you, likely 201 Priority: 0 Wireless and Wired: AllThis should restart the modem, and it should result in you getting full speed internet access from your non-CL provided router!
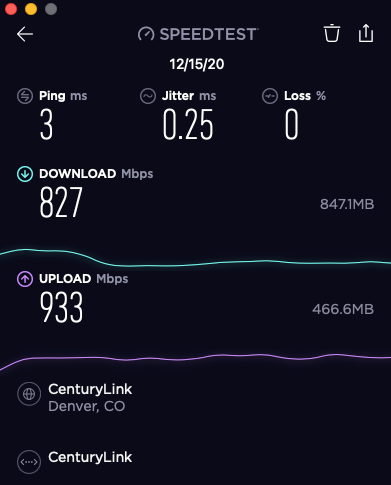
Here is a screenshot of a test I ran in the middle of day while on a video conference with my familly also using the internet. Pretty darn good and much better WiFi range due to the external antenna’s on the Netgear.  Please let me know if you found this helpful.