I am quite a fan of Marlin which is the default firmware on most printers; it works out of the box, its VERY well documented and compiling and flashing isn’t THAT much of a pain but I kept hearing about Klipper and how much better it is. After going down the path of installing it myself, I know agree it’s WORLDS better than Marlin, but there is quite a learning curve getting to just have a successful first print, much less taking advantage of resonance compensation and pressure advance.
This will be the first of a series of Klipper posts. This post’s goal is to get you beyond just flashing your firmware and to you first successful Klipper print. So buckle up and devote an hour to getting this right.
Prerequisites:
- A printer running a board capable of running Klipper. This tutorial will cover installation on a Creality Ender 3 S1, but should work for most other more “modern” printers.
- A Raspberry Pi, you can use anything newer than 3B. I have 4 and bought it before prices were crazy.
- 2 decent quality 8GB SD Cards. One for printer, one for Pi
- Power supplies, cables etc..
- Your bed is trammed/level etc using the screws not just the ABL software.
The shortage of Pi’s is starting to end, and you can get them for retail. I have found RPILocator to be a great site to be able to grab a Pi for a normal price when they pop up or you can get a clone. This video from LTT gives a great overview. Pretty much any of the alternatives would work.
Installation
I am outlining the steps below, but MainsailOS also provides good documentation here.
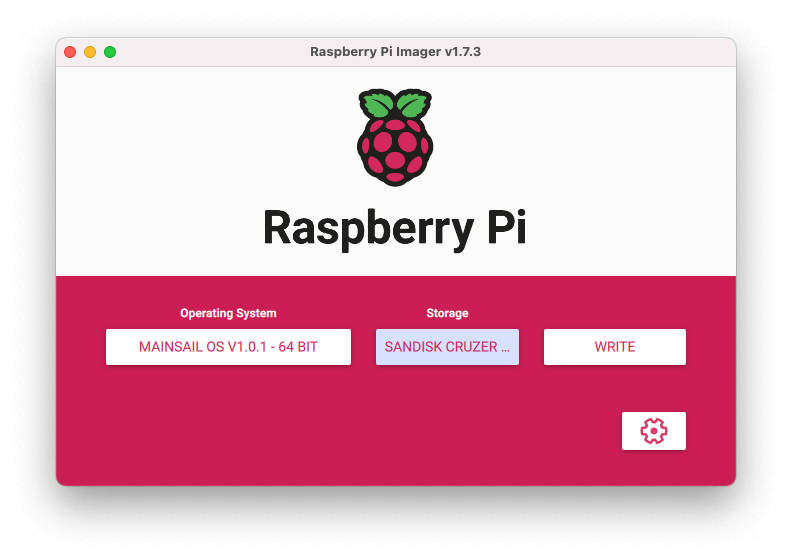
- Download the free Raspberry Pi Imager here
- Select Choose OS > Scroll Down to “Other Specific Purpose OS” > 3D printing > Mainsail OS (I choose the 64 bit, but feel free to use 32)
- Insert your SD card and choose it from storage
- Click the gear/cog icon and do the following:
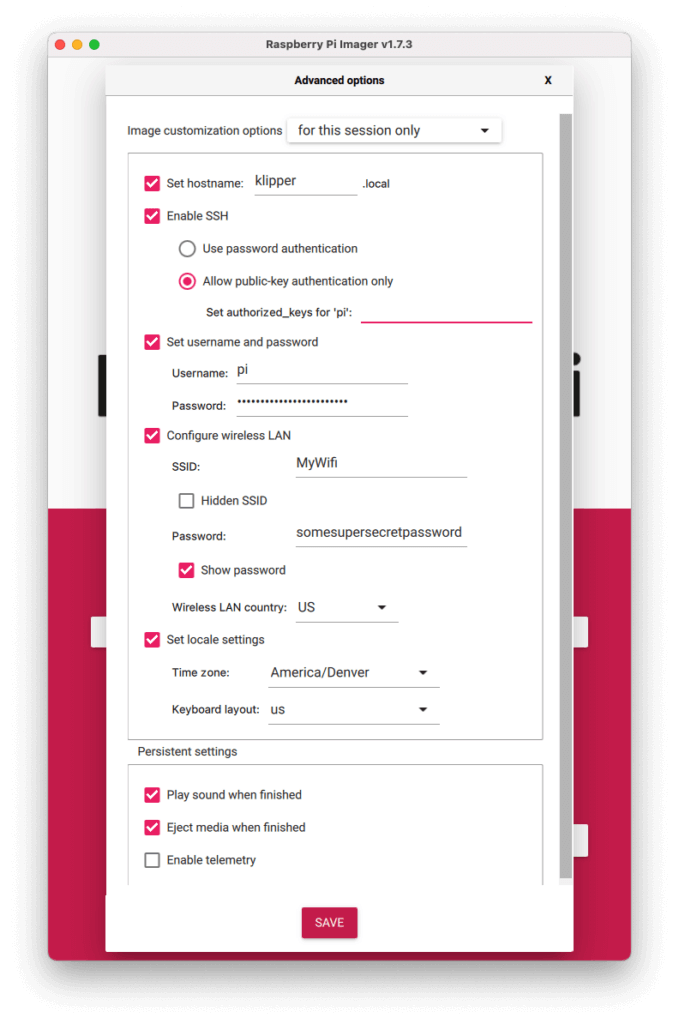
- Check set hostname, and use something like klipper
- Enable SSH and if you aren’t familiar here select use password authentication
- Do not change username, and add a secure password
- If you are using Wifi add the SSID and Password otherwise leave blank if you are using Ethernet
- Change LAN country to where you live
- Set locale to where you live
- Select Save and then Write
Flashing Firmware
- Once the card is done writing, eject it and put it in the PI, and connect your Pi to the network (either from the Wifi you used before or ethernet), There is no need to connect to the printer right now.
- Verify everything is working by going to http://klipper.local (or whatever hostname you setup) or going to the IP address if known
- Open up Terminal in Mac, or Putty on Windows and do the following.
- Type
ssh [email protected]or whatever username you used if not Pi. - Enter the password you created
- Type
cd klipper - Type
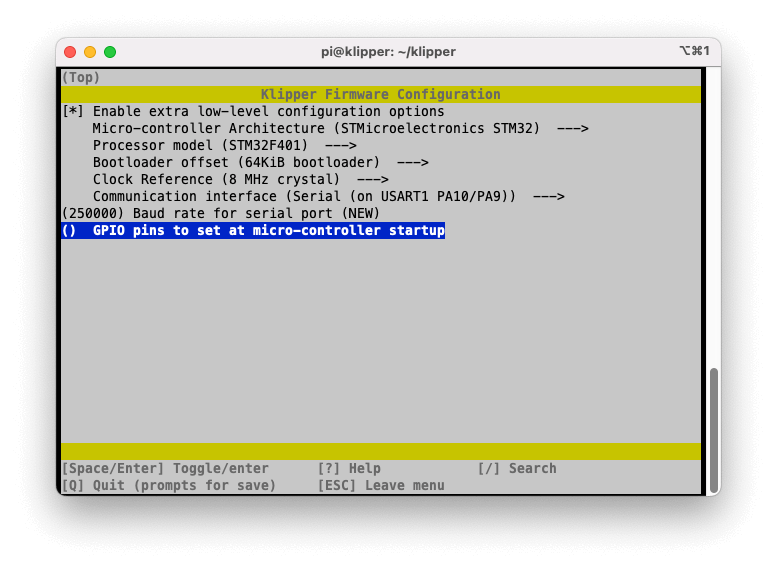
make menuconfigand you should see a new GUI menu popup.
- Type
- Each config will be slightly different here. The setup for a Ender 3 S1 / Pro with a F4 chip is above. When reviewing the Processor Model you should be able to see yours.Once done hit
qand save and quit. - Type
makeand wait as your bin file is created - Type
exitto exit your SSH session, but keep your window opn - If on a Mac, type
cd Desktopto get to the desktop folder. If on Windows typelsto know where you are. - Type
scp [email protected]:/home/pi/klipper/out/klipper.bin ~/Desktopreplacing ~/desktop to whatever folder you want it saved if on windows. This will download your firmware to your computer to flash on the printer’s SD card - Put in the printer SD card. If using a F4 chip like I have create a folder named
STM32F4_UPDATE - Copy the klipper.bin file to the folder, eject the SD card.
- Turn off your printer, If your printer has a display, unplug it as well as any USB cables.
- Put in SD card
- Turn on printer, wait 60 seconds
- Turn off printer, unplug SD card, plug in cable from Raspberry PI to Printer
- Turn on printer
- Go back to
klipper.localin your webbrowser and look for the power button in the top right and selectfirmware restartonce compete you should see your printer now showing up in Klipper. Congrats you flashed your printer!
Initial Configuration
Assuming before you undertook the level with the existing Marlin software you should only need to setup the following Bed Size, Auto Bed Level Size/Points, and Z-Index. I’m going to borrow from Klipper Docs a bit here.
For the rest of this tutorial you will be working in your web browser at klipper.local
- In left nav go to
machineand create a new file using the icon with a plus. Name it printer.cfg - Assuming you have and Ender 3S1, Copy and paste the contents of the following link into the file, and then save and restart.
- If you don’t have an Ender 3 S1 or a Pro, please review and edit the file for your printer or use other starter file in Config_examples in the web interface
- NOW THE HARD PART: Since every printer is different you may need to mess with the X/Y/Z Min and Max’s. I have you starting with mine, but that may mean you need to adjust a few numbers for yours. This is how I do it.
- In Mainsail > Console I do the following commands
G28;home everythingG1 X200which moves the x axis to 200. From there I move 10 at a time. SoG1 x210,G1 x220, if I get an error. I rehome withG28` dial back, sog1 x219until I don’t get an error. I will then enter that in the `position_max` printer.cfg sand save and restart.- I then do the `position_min` starting at 0, going negative 2,4,6
- I then do the same for Y. So
G1 Y200etc..
- Once this all complete I have the proper size of the bed stored in the code
- In Mainsail > Console I do the following commands
- Z-Probe Offset: Mainsail added a nice UI for this, so its not so bad
- Type
g28to home printer, then move probe to the center of the bed it will be something likeG1 X140 Y140z5 but keep moving until you are in the center - Type
probe_calibrateand a popup window will popup. 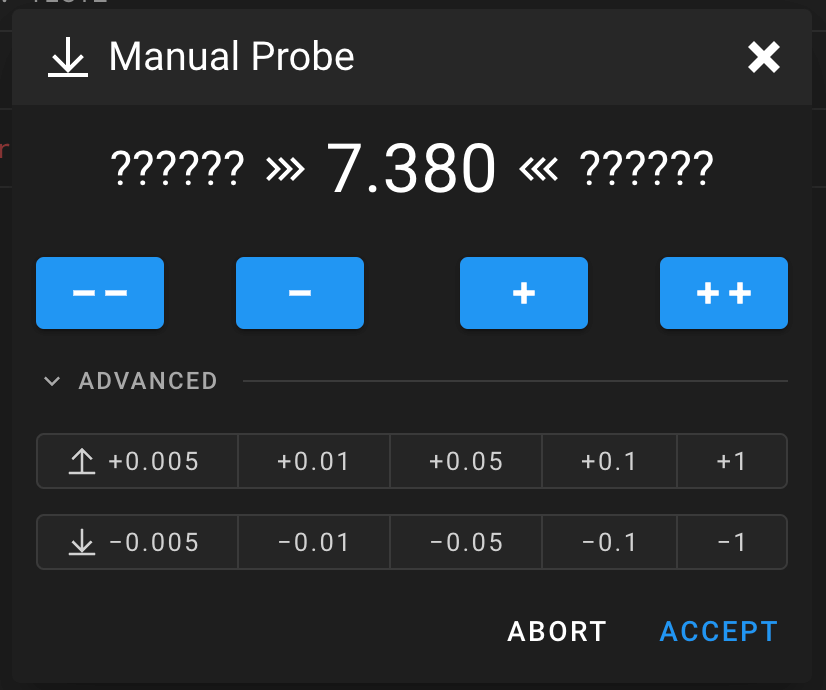 You can then start with the -1 button on the top right, and moving to smaller increments until you find the right height off the bed. Standard Z-Probe Offset.
 - Once you find the perfect offset, hit
acceptand thensave_config
- Type
- Auto Bed Leveling: The settings I gave you for points to bed level are “safe” in that you won’t cover the full bed, but you won’t run out of range. If your bed is bigger adjust those numbers as you see fit before following along:
- Home with
G28 - In console type
BED_MESH_CALIBRATEand it will make a 8×8 mesh across the printer. - Once done go to the Height Map tab and see your new mesh. If you need to do any manual tramming do it, then go do BED_MESH_CALIBRATE again. When you are happy with the mesh type
SAVE_CONFIGand Klipper will restart. Your mesh is now made. If your bed is really bad or you want to go down a rabbit hole of settings the Klipper website has some great docs: here. That is well beyond getting to your first print
- Home with
Your First Print
We now have Mainsail, Klipper and your firmware sorted. The last step is setting up your slicer. I’ll use Cura here and assume your printer is already there, there are a million ways to dial this in, but lets get started with the basics.
- In Cura go to Preferences > Configure > Printers > Machine Settings and delete what is there for this instead:
Start G-CODE
M140 S{material_bed_temperature_layer_0} ;Start heating bed
M190 S{material_bed_temperature_layer_0} ;Wait for bed to reach temp
G4 P5000
G28
BED_MESH_PROFILE LOAD=default ;load the mesh
M104 S{material_print_temperature_layer_0} ;Start heating extruder
M109 S{material_print_temperature_layer_0} ;Wait for extruder to reach temp before proceeding
G92 E0 ; Reset Extruder
G1 Z2.0 F3000 ; Move Z Axis up little to prevent scratching of Heat Bed
G1 X0.5 Y20 Z0.3 F5000.0 ; Move to start position
G1 X0.5 Y200.0 Z0.3 F1500.0 E15 ; Draw the first line
G1 X0.8 Y200.0 Z0.3 F5000.0 ; Move to side a little
G1 X0.8 Y20 Z0.3 F1500.0 E30 ; Draw the second line
G92 E0 ; Reset Extruder
G1 Z2.0 F3000 ; Move Z Axis up little to prevent scratching of Heat Bed
G1 X5 Y20 Z0.3 F5000.0 ; Move over to prevent blob squish
End G-CODE
G91 ;Relative positioning
G1 E-2 F2700 ;Retract a bit
G1 E-2 Z0.2 F2400 ;Retract and raise Z
G1 X5 Y5 F3000 ;Wipe out
G1 Z50 ;Raise Z more
G90 ;Absolute positioning

G1 X0 Y220 ;Present print
M106 S0 ;Turn-off fan
M104 S0 ;Turn-off hotend
M140 S0 ;Turn-off bed
M84 ;Disable steppers- Once this is done, check your slicer options to make sure you don’t have Coasting Turned on or Arc welder turned on. If you do just uncheck them. If you use my Marlin profiles you will need to do this.
- Choose a good benchmark model
- Slice, save, go to Klipper to Upload
- Start Print
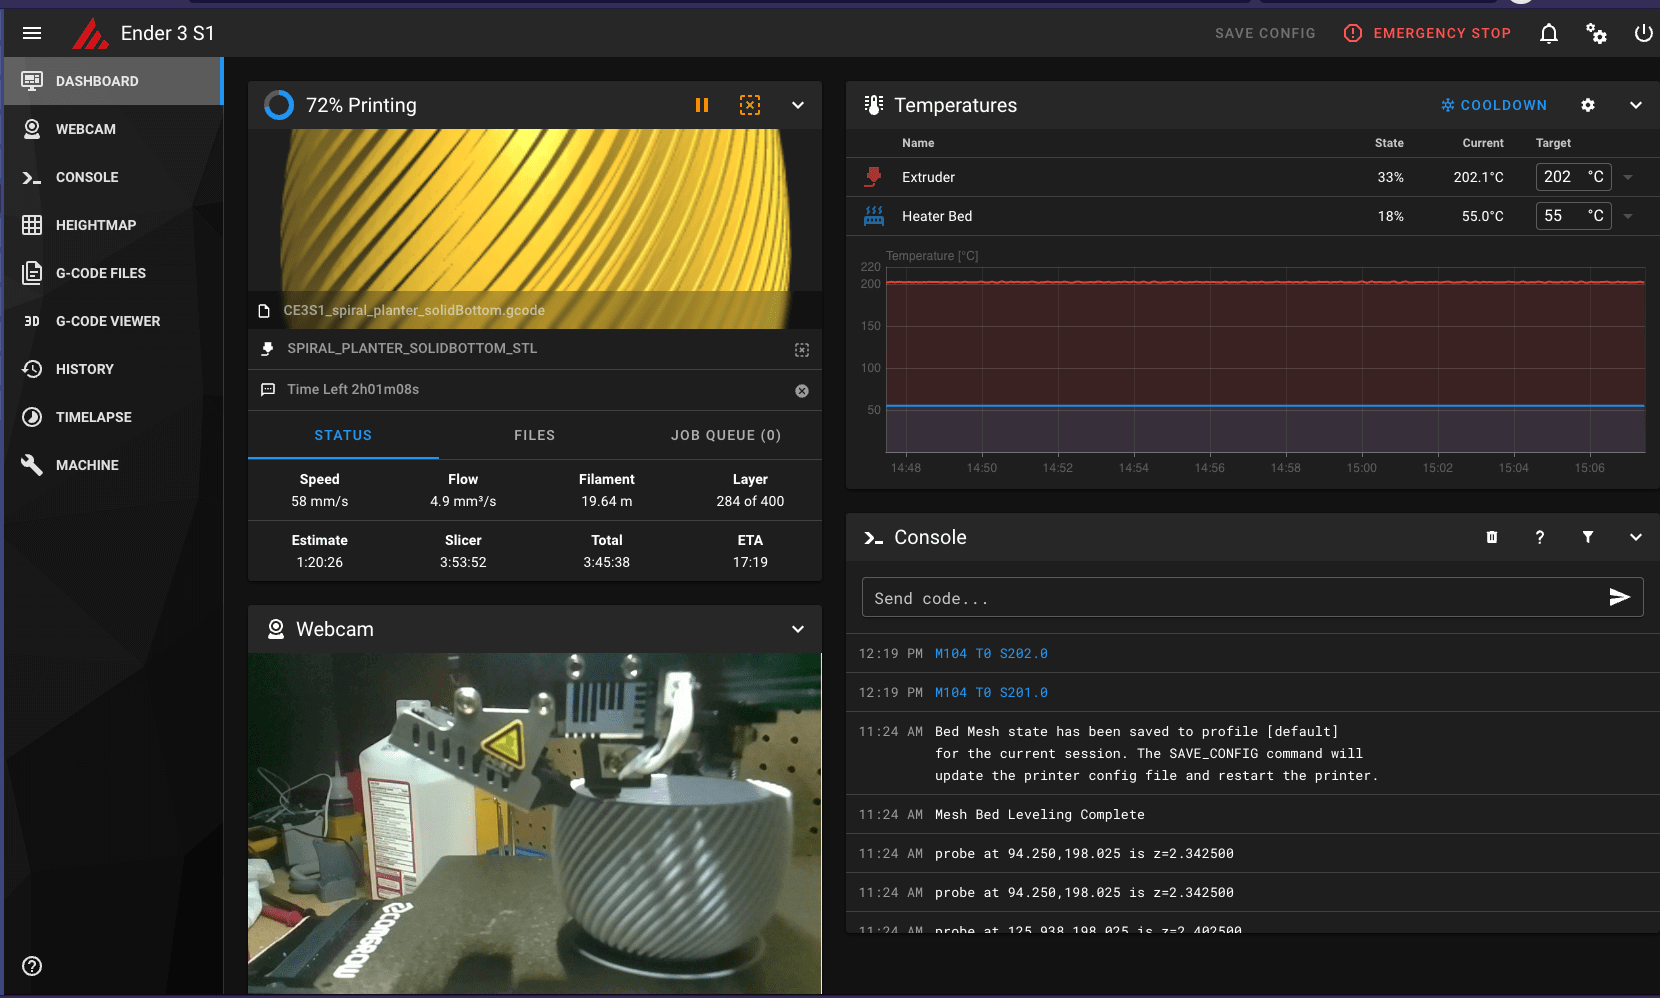
If all has gone well this should now be printing your first print with Klipper. Celebrate with a beer, tea, whatever. We just did ALOT.
Now your mind will go to, I want to print faster, I want a touch screen, I want…. We will get to that in future posts. For now I just wanted to get us from Zero to Print with this first guide. Something I haven’t found elsewhere.
Part 2: Calibrating you PID
References
https://3dprintbeginner.com/how-to-install-klipper-on-ender-3-s1/