One of the key features of using OctoPrint is that you can monitor your print remotely from your computer/phone and a key part of monitoring that is of course the webcam. I ordered some cheapo Raspberry Pi clone from Walmart. I linked to the one I bought, but I don’t recommend it
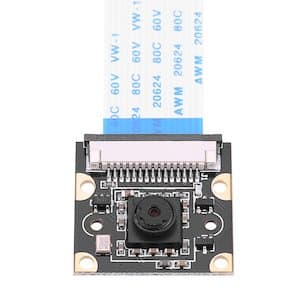
Out of the box this just works. I plugged in the ribbon cable to the Pi, restart and the cam just worked. This was great. However the quality wasn’t great. I assume it was just the lighting in my basement but then realized it was only grabbing an 640 pixel wide image. I knew the camera could do MUCH better than.
I poked around the Octoprint UI way to long and realized through ALOT of Googling that you can’t do it there. If you want to up the resolution you need to SSH into the PI and edit a configuration file. Being pretty experienced with Linux this was easy, but I wanted to document this for anyone else that wants better resolution from their Raspberry Pi camera or clone.
Step 1: SSH into Pi
Assuming you have setup SSH. If not you will need to turn off Octoprint, put the SD card into your computer and add an empty file titled .ssh to the root folder of your SD card. After than put it back in the PI and start it up.
SSHH into pi with (most likely) the following command:ssh [email protected]
If you haven’t set a custom password it would be raspberry but you should REALLY change it.
Step 2: Determine available resolutions:
Enter the following command command: v4l2-ctl -d /dev/video0 --list-formats-ext
This should give you a list with a bunch of information including something similar to the following.
	[5]: 'MJPG' (Motion-JPEG, compressed)
		Size: Stepwise 32x32 - 2592x1944 with step 2/2
Without going too much into details this shows my camera supports a max resolution of 2592×1944, which happens to be a 4×3 image and not 16:9.
Step 3: Update resolution in OctoPi’s configuration
Use the Nano text edit to edit the octopi text file with the following command:sudo nano /boot/octopi.txt
This is a fairly large file and very well documented so if you are interested please read it.
The one line you will need to add/edit is:
camera_usb_options="-r 2592x1944 -f10 then close the file with CTRL X, and save with Y and restart the pi with: sudo reboot now
With that your Octoprint instance should be showing a much higher quality image in OctoPrint and as a standalone screenshot. You can test that by going here: http://octopi.local/webcam/?action=snapshot in my case I am correctly seeing my desired resolution. Easy as pi.
Appendix
There is quite a bit of advanced options out there, well beyond what you may need but I wanted to list it here for those interested.
The following information is taken right from this blog post, I copied and pasted it directly is because forum posts generally don’t age well and having it on something more permanent may be useful. To everything below I take no credit for.
USB webcams (input_uvc.so)
input_uvc.so comes bundled with MJPG Streamer.
See also the documentation for the recommended MJPG Streamer fork (bundled with OctoPi) 4.2k for additional options not listed here.
-d <device>: The video device to use, e.g.-d /dev/video0-r <resolution>: The resolution, e.g.-r 640x480for 640x480px-f <framerate>: The framerate in frames per second, e.g.-f 10for 10 fps-q <quality>: The quality of the JPG compression to use, e.g.-q 85for compression down to 85%-y: Use this if your camera doesn’t support MJPG, pictures will be captured in YUVY
Raspicam (input_raspi.so)
input_raspi.so is included in this MJPG Streamer fork 2.4k by Jackson Liam 89 which also supports the Raspberry Pi Camera 1.5k. This is the fork that is shipped on the OctoPi SD card image for the Raspberry Pi.
See also the documentation 1.9k for more information about these options.
-fpsor--framerate: set video framerate, default 1 frame/sec-xor--width: width of frame capture, default 640-yor--height: height of frame capture, default 480-quality: set JPEG quality (0 to 100), default 85-usestills: uses stills mode instead of video mode-sh: Set image sharpness (-100 to 100)-co: Set image contrast (-100 to 100)-br: Set image brightness (0 to 100)-sa: Set image saturation (-100 to 100)-ISO: Set capture ISO-vs: Turn on video stablisation-ev: Set EV compensation-ex: Set exposure mode, valid values (according to the RaspiCam 2.1k documentation):offauto: Use automatic exposurenight: Select setting for night shootingnightpreviewbacklight: Select setting for back-lit subjectspotlightsports: Select setting for sports (fast shutter etc.)snow: Select setting optimized for snowy scenerybeach: Select setting optimized for beachverylong: Select setting for long exposuresfixedfps: Constrain fps to a fixed valueantishake: Antishake modefireworks: Select setting optimized for fireworks
-awb: Set AWB mode, valid values (according to the RaspiCam 2.1k documentation):off: Turn off white balance calculationauto: Automatic mode (default)sun: Sunny modecloudshade: Cloudy modetungsten: Tungsten lighting modefluorescent: Fluorescent lighting modeincandescent: Incandescent lighting modeflash: Flash modehorizon: Horizon mode
-ifx: Set image effect (according to the RaspiCam 2.1k documentation):none: No effectnegative: Produces a negative imagesolarise: Solarise the imagewhiteboard: Whiteboard effectblackboard: Blackboard effectsketch: Sketch-style effectdenoise: Denoise the imageemboss: Embossed effectoilpaint: Oil paint-style effecthatch: Cross-hatch sketch stylegpen: Graphite sketch stylepastel: Pastel effectwatercolour: Watercolour effectfilm: Grainy film effectblur: Blur the imagesaturation: Colour-saturate the imagecolourswap: Not fully implementedwashedout: Not fully implementedposterise: Not fully implementedcolourpoint: Not fully implementedcolourbalance: Not fully implementedcartoon: Not fully implemented
-cfx: Set colour effect (U:V), the supplied U and V parameters (range 0 to 255) are applied to the U and Y channels of the image. For example,--colfx 128:128should result in a monochrome image (according to the RaspiCam 2.1k documentation).-mm: Set metering mode (see raspistill notes), valid values (according to the RaspiCam 2.1k documentation):average: Average the whole frame for meteringspot: Spot meteringbacklit: Assume a backlit imagematrix: Matrix metering
-rot: Set image rotation (0-359, at the present only 0, 90, 180 and 270 are supported though)-hf: Set horizontal flip-vf: Set vertical flip
Sources
https://community.octoprint.org/t/better-resolution-image-quality-from-web-cam/21124
https://community.octoprint.org/t/available-mjpg-streamer-configuration-options/1106
https://picamera.readthedocs.io/en/latest/fov.html#sensor-modes